 Find a Hobby Shop
 Live Chat
Posted: 2/6/21
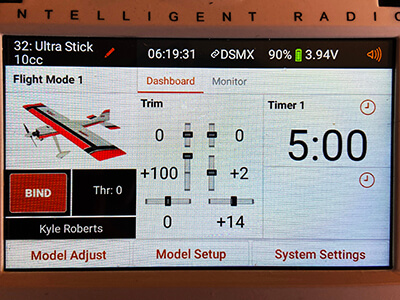
Spektrum makes managing model setups a breeze with the DX, iX, and NX radios.
Are you the proud new owner of a Spektrum transmitter? Congratulations! However, if you landed on this webpage, odds are you researching how to transfer, import, or export models from your old radio to your new one. Or perhaps you are a proactive pilot who simply likes to back-up their models on occasion. Fear not, for the process is relatively easy and quite intuitive if you follow the steps below. We will be using the SD/Micro SD card process for this article but note there are additional methods should you chose to use them.
Important Notes:
-
Be mindful that Spektrum radios import/export models in different file formats depending on the generation of radio.
- DX radios can only read/write in the ".SPM" format file format
- Updated iX radios can read/write ".iSPM" and ".SPM" format. They can also read-only ".NSPM"
- NX radios can read/write ".NSPM". They can read-only ".iSPM", ".SPM" format
-
Consequently, it is not possible to move a model that was created on an NX radio to a DX radio.
Some functionality and/or settings may not 100% transfer as desired between radios. Things like timer settings, alerts, and/or model photos are the most obvious. However, be mindful that items that were originally assigned to a two-position switch may need to be checked/corrected if they will now be operated with a three-position switch (an example would be dual-rate becoming triple-rates).
-
Most importantly, both your new AND old transmitter will require the latest software update to successfully perform any/all model import/export features. We recommend doing this FIRST before proceeding to the steps below.
-
We will be using a DX6 for this portion of the article. However, this process can be mirrored on many applicable models including the DX6e, DX8e, DX7, DX8, DX9, DX10T, DX18, DX20, etc. If you encounter any issues during this process, please reference the Important Notes section above.
- Part 1: Exporting Models
-
DX Part 1: Exporting Models
-

Step 1:
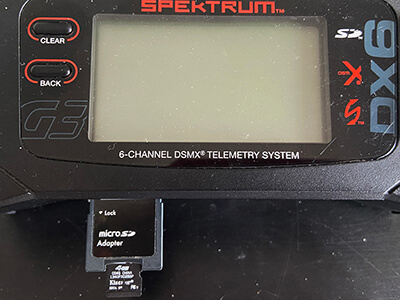
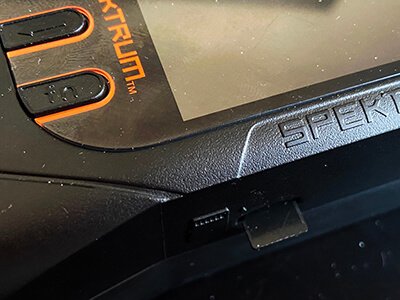
Insert a micro SD memory card into an SD adapter. Now, insert the card into the SD card reader on the radio itself. We recommend using a micro SD card as most new radios released by Spektrum will feature this style of card reader. Tip: For the sake of saving you time later, if you only plan only exporting one (1) model, switch to that model now before doing anything else. -

Step 2:
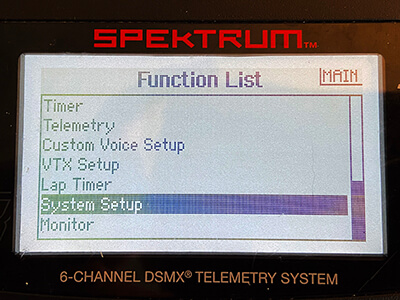
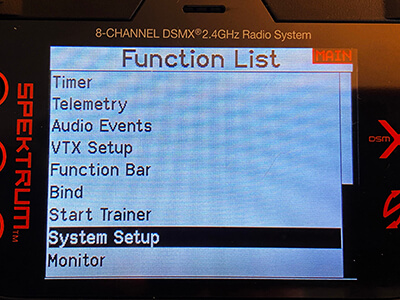
With your transmitter powered on, enter your Function List and scroll down/select the "System Setup" option. -
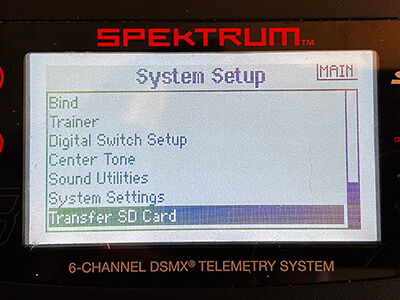
Step 3:
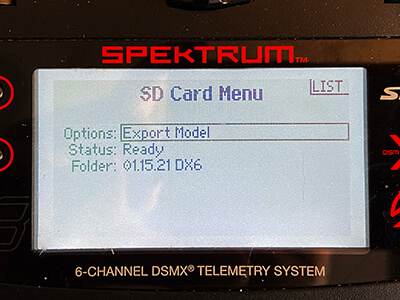
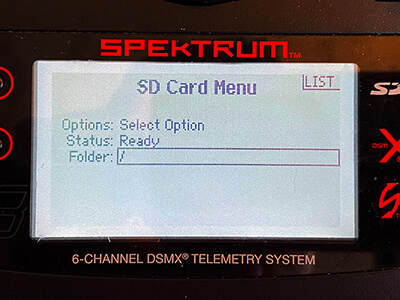
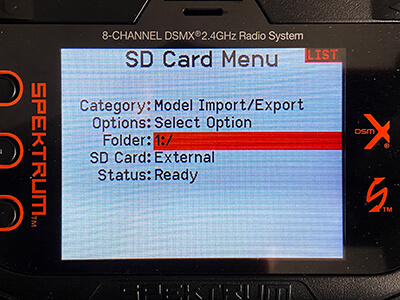
Scroll down and locate the "Transfer SD Card" option. Select this, which will bring you to a screen titled "SD Card Menu." -
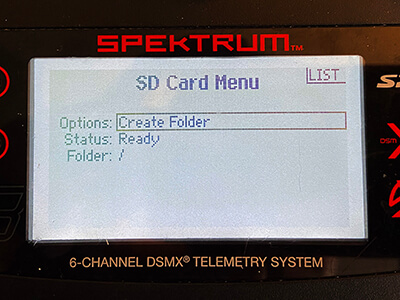
Step 4:
Although not required, I like to create a new/empty folder on my SD card each time I export new models. Within the "Options" selection, scroll over and select "Create Folder." -
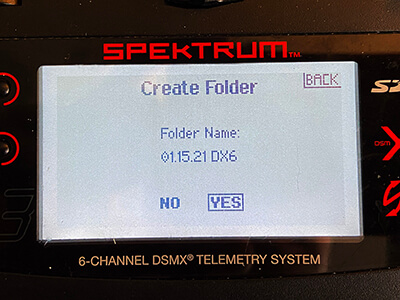
Step 5:
Typically, I like to label the folder with todays date and the name of the radio I am exporting from. -
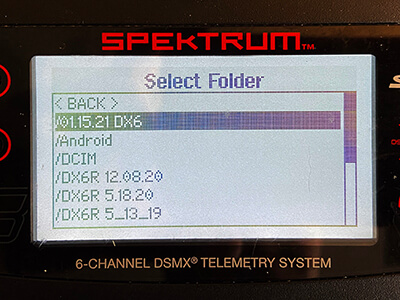
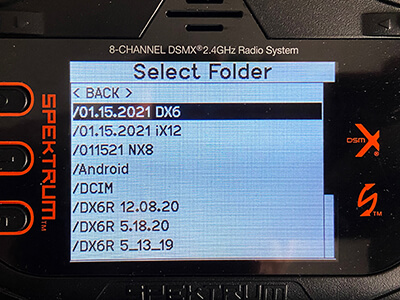
Step 6:
We now need to select the folder where our model(s) will be exported to. I am going to select my new folder (titled "01.15.21 DX6"), although you could simply export to the original destination. -
 Step 7:
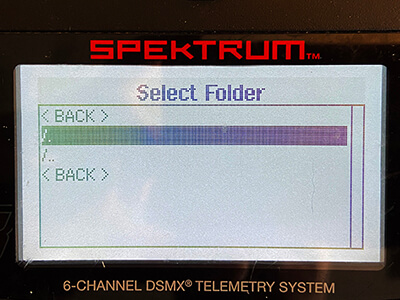
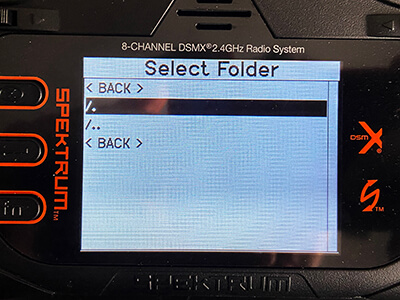
This screen is a bit misleading. Here are some tips:
Both <BACK> options do NOT select a folder, but rather exit and return you to the "SD Card Menu."
The /.. selection physically goes up one folder level on the SD card itself, basically returning you back to the previous folder options.
The /. is the option we are looking for as it physically selects this folder as the destination for your model files. Use this selection. -
Step 8:
You should be returned to the "SD Card Menu" screen and it should look like this (with the new folder showing up at the bottom). Now, under the "Options" selection, scroll over to either "Export Model" or "Export All Models." -
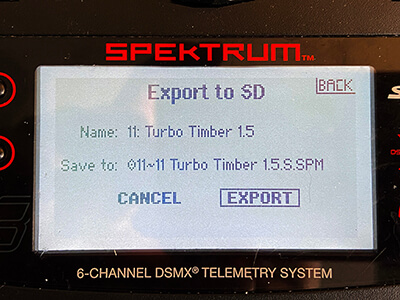
Step 9:
For the sake of this article, I will only be exporting one model (my E-flite Turbo Timber 1.5m). If the model you plan on Exporting is not currently selected, you will need to change to that model first before proceeding. -
Step 10:
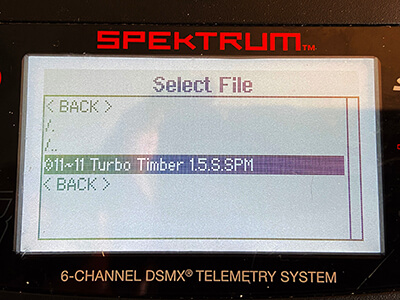
Done! Your model(s) should now be on the SD Card in the folder we built above. You can double-check this by inserting your SC card into a computer OR by pretending to do a model import and confirming that the file does indeed exist in the directory you chose (learn more about this in the import section below). You can use this file and import the contents to an iX, NX, or different DX radio.
-
- Part 2: Importing Models
-
DX Part 2: Importing Models
-
Step 1:
Insert a micro SD memory card into an SD adapter. Now, insert the card into the SD card reader on the radio itself. We recommend using a micro SD card as most new radios released by Spektrum will feature this style of card reader. -
Step 2:
With your transmitter powered on, enter your Function List and scroll down/select the System Setup option. -

Step 3:
Scroll down and locate the "Transfer SD Card" option. Select this, which will bring you to a screen titled "SD Card Menu." -
Step 4:
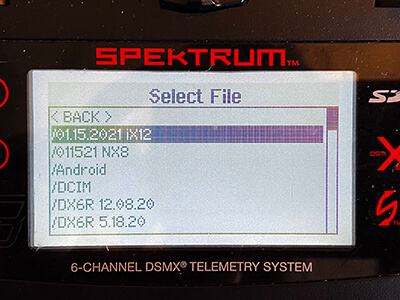
We now need to find/select the folder where our model(s) are located. I am importing a model from my folder titled "01.15.2021 iX12." -
Step 5:
Navigating through folders can be tricky. Here are some tips:Both <BACK> options do NOT select a folder, but rather exit and return you to the SD Card Menu.
The /.. selection physically goes up one folder level on the SD card itself, basically returning you back to the previous folder options.
The /. selection physically selects the folder you are in. This isnt applicable for importing a single model, but rather a folder with multiple models (import all for example).
-
Step 6:
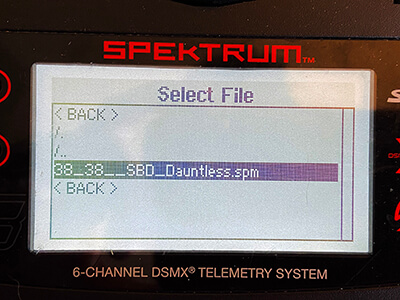
After selecting my folder, I can navigate down to my desired model for import, my SBD Dauntless. If you intend using the "Import All Models" function, you only need to select the root folder itself, not the individual models themselves. -
Step 7:
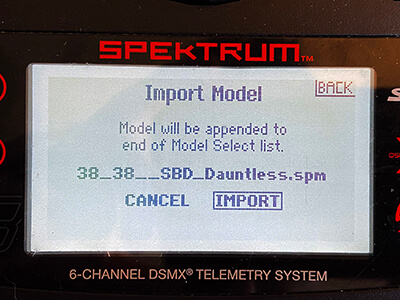
After selecting this model, we arrive at a screen confirming our selection and providing clarification that this model will be appended to the end of "Model Select" list. Now, select import. -
Step 8:
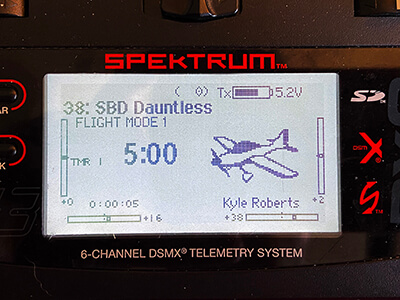
After a few seconds the process is complete. You are taken back to the main screen and defaulted to your newly imported model! Remember to confirm ALL transmitter settings and do a pre-flight check prior to flying!
Learn more about updating your transmitter on YouTube.
- Part 1: Exporting Models
-
We will be using an iX12 for this portion of the article. However, this process can be mirrored on other applicable models including the iX20. If you encounter any issues during this process, please reference the Important Notes section above.
- Part 1: Exporting Models
-
iX Part 1: Exporting Models
-
Step 1:
Insert a micro SD memory card into an SD adapter. Now, insert the card into the SD card reader on the radio itself. We recommend using a micro SD card as most new radios released by Spektrum will feature this style of card reader. -
Step 2:
Begin by powering on your transmitter and entering AirWare. On the home screen, tap the top-left corner where your current model name is displayed then long-press proceed to disable RF. -

Step 3:
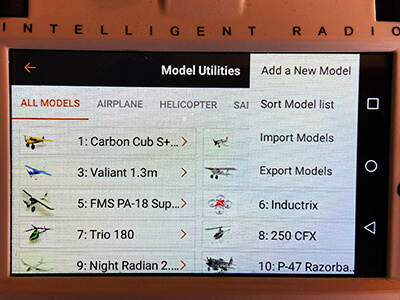
In the top-right of the "Model Utilities" screen, you will see three stacked dots. Tap this selection and tap the "Export Models" selection. -
Step 4:
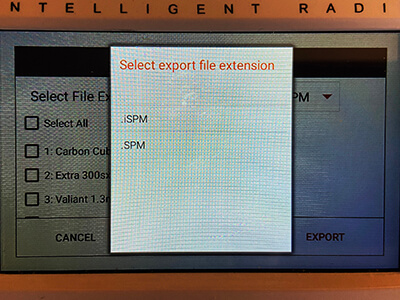
Note that you need to select your file extension before proceeding. If you are transferring model(s) to a DX radio, you need to export in the .SPM format. If you are transferring to another iX radio, choose the .iSPM selection. Note that the NX radio family can read either format. -
Step 5:
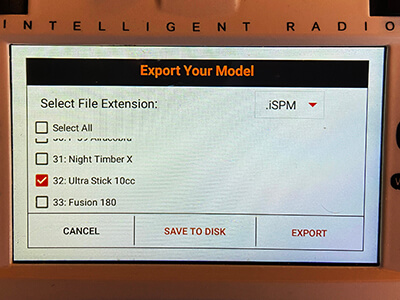
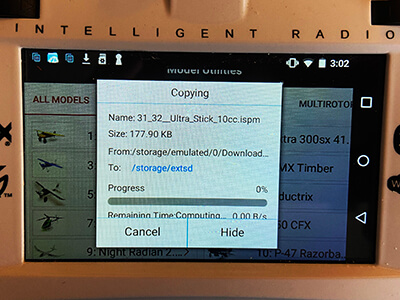
For the sake of this article, I will only be exporting one model (my Hangar 9 Ultra Stick 10cc). However, you can select as many models as you like (or all of them) at this time. The "Save to Disk" option only saves your model locally (which is not our goal). We need to select the “Export” feature. -
Step 6:
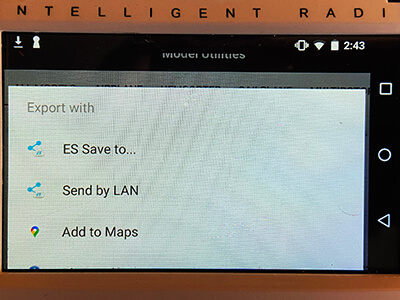
You have now entered the Export with screen, where we need to select the "ES Save" to function. -
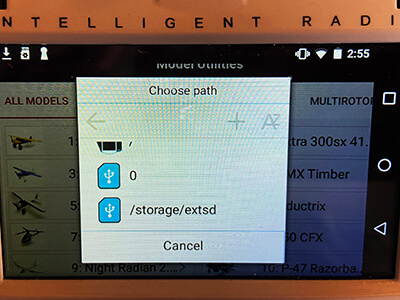
Step 7:
Before you move forward, select the back arrow < on the Choose Path screen. Now, navigate down and tap to where it reads "/storage/exsd." You will be returned to the Choose Path screen, where you need to tap select again. -

Step 8:
You may get a Hint pop-up at this time asking for you to choose the root directory. Tap select, which will bring you to another folder/directory screen. -

Step 9:
To correct this, located the three stacked bars in the top left of the screen. Tap this option and navigate to and select the extsd option. If you do NOT plan on creating/naming a folder for your files, skip to Step 12. -
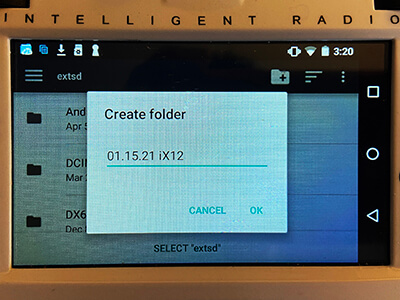
Step 10:
At this point, I like to create a new/empty folder on my SD card. To do so, tap the + option (to create a new folder). I label the folder with todays date and the name of the radio I am exporting from. After naming your folder, you select ok. -
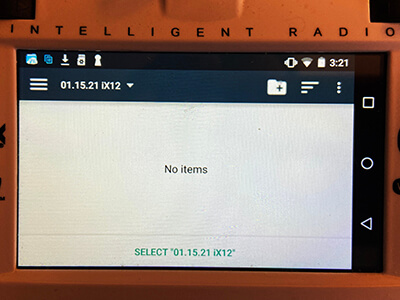
Step 11:
Your screen should display an empty folder with the title displayed in the top left. Now, tap the select button at the bottom of the screen. This will dump you back to the Choose Path screen. YOUR FOLDER MAY NOT BE VISIBLE. You need to refresh this screen, which can be done by pressing the < arrow, then reselecting the "/storage/extsd" option. -
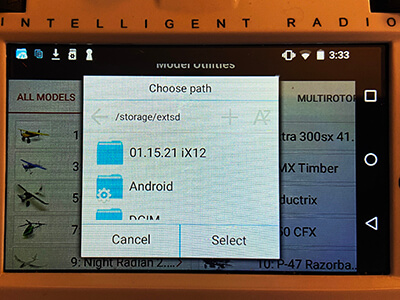
Step 12:
Your folder should now be visible. Tap it, the tap the select feature, which essentially finalizes the location and begins the export process. If you get an error and/or the export appears to be stuck, you may need to cancel, go back to Step 8, and correct the root directory. Be sure to select the extsd option again, then chose the proper folder for the exported model(s). -
Step 13:
Done! Your model(s) should now be on the SD Card in the folder we built above. You can double-check this by inserting your SC card into a computer OR pretending to do a model import and confirming that the file does indeed exist in the directory you chose (learn more about this in the import section below). You can use this file and import the contents to another iX, NX, or DX radio.
-
- Part 2: Importing Models
-
iX Part 2: Importing Models
-

Step 1:
Insert a micro SD memory card into an SD adapter. Now, insert the card into the SD card reader on the radio itself. We recommend using a micro SD card as most new radios released by Spektrum will feature this style of card reader. -

Step 2:
Begin by powering on your transmitter and entering AirWare. On the home screen, tap the top-left corner where your current model name is displayed then long-press proceed to disable RF. -
Step 3:
In the top-right of the "Model Utilities" screen, you will see three stacked dots. Tap this selection and tap the Import Models selection. -
Step 4:
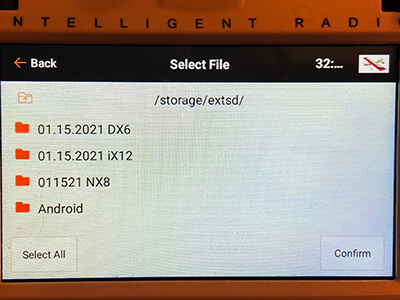
We now need to find/select the folder where our model(s) are located. I am importing a model from my folder titled "01.15.2021 DX6." -
Step 5:
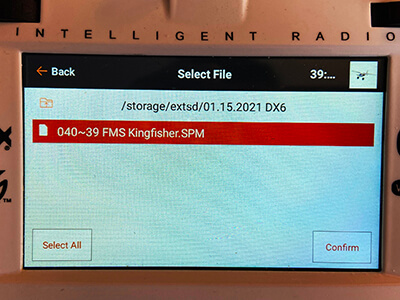
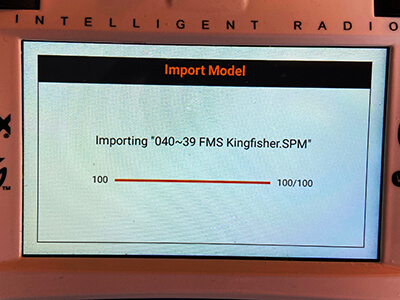
After selecting my folder, you need to tap/select the model(s) you wish to import. Each model should highlight as seen in the photo. For the sake of the article, I am only importing one model, my FMS Kingfisher. Once you have selected all applicable models, tap the confirm button. -
Step 6:
Briefly you see get a loading screen. If you are importing multiple models, this may take a minute. -
Step 7:
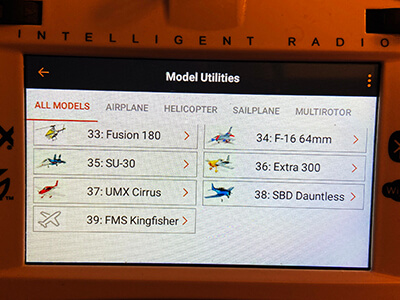
When the process is complete, you should be taken back to the "Model Utilities" screen. Scroll down to your newly imported model(s). Remember to confirm ALL transmitter settings and do a pre-flight check prior to flying!
Learn more about updating your transmitter on YouTube.
- Part 1: Exporting Models
-
We will be using a NX8 for this portion of the article. However, this process can be mirrored on other applicable models including the NX6 and NX10. If you encounter any issues during this process, please reference the Important Notes section above.
- Part 1: Exporting Models
-
-

Step 1:
Insert a micro SD memory card into card reader on the radio itself. For the sake of saving you time later: If you only plan only exporting one (1) model, switch to that model now before doing anything else. -

Step 2:
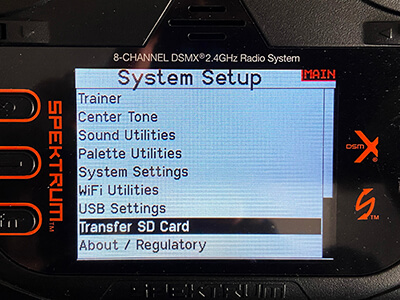
With your transmitter powered on, enter your Function List and scroll down/select the "System Setup" option. -
Step 3:
Scroll down and locate the "Transfer SD Card" option. Select this, which will bring you to a screen titled "SD Card Menu." -
Step 4:
Although not required, I like to create a new/empty folder on my SD card each time I export new models. Within the Category selection, scroll over and select "File/Folder Management." -
Step 5:
Now, within the "Options" selection can find/select the "Create Folder" option. -
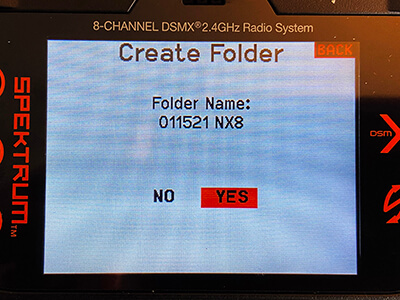
Step 6:
Typically, I like to label the folder with todays date and the name of the radio I am exporting from. IMPORTANT: As of this article being published, the NX Family of transmitter is sensitive to using special characters to name folders. As a result, we advise against using anything other than letters and numbers. For example, a folder titled "01.15.2021 NX8" would result in an error. Instead, use "01152021 NX8." -
Step 7:
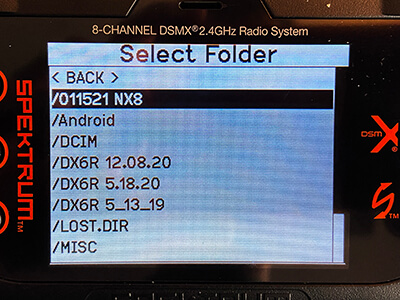
We now need to select the folder where our model(s) will be exported to. I am going to select my new folder (titled 011521 NX8), although you could simply export to the original destination. -
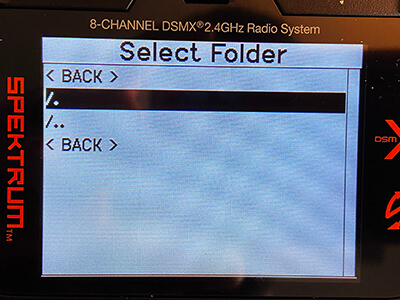
Step 8:
This screen is a bit misleading. Here are some tips:Both <BACK> options do NOT select a folder, but rather exit and return you to the "SD Card Menu."
The /.. selection physically goes up one folder level on the SD card itself, basically returning you back to the previous folder options.
The /. is the option we are looking for as it physically selects this folder as the destination for your model files. Use this selection.
-
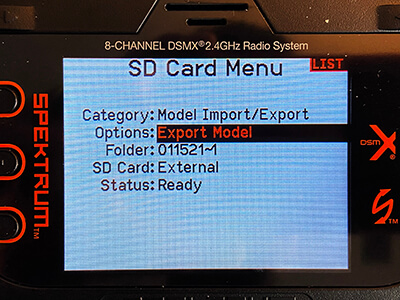
Step 9:
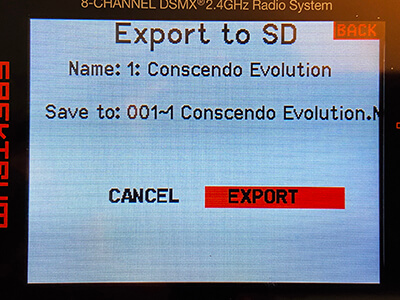
You should be returned to the "SD Card Menu" screen and it should look like this (with the new folder showing up at the bottom). Now, under the "Options" selection, scroll over to either "Export Model" or "Export All Models." For the sake of this article, I will only be exporting one model (my E-flite Conscendo Evolution). If the model you plan on Exporting is not currently selected, you will need to change to that model first before proceeding. -
Step 10:
Done! Your model(s) should now be on the SD Card in the folder we built above. You can double-check this by inserting your SC card into a computer OR by pretending to do a model import and confirming that the file does indeed exist in the directory you chose (learn more about this in the import section below). You can use this file and import the contents to an iX, NX, or different DX radio.
-
- Part 2: Importing Models
-
-
NX Part 2: Importing Models
-
Step 1:
Insert a micro SD memory card into card reader on the radio itself. -
Step 2:
With your transmitter powered on, enter your Function List and scroll down/select the "System Setup" option. -

Step 3:
Scroll down and locate the "Transfer SD Card" option. Select this, which will bring you to a screen titled "SD Card Menu." -
Step 4:
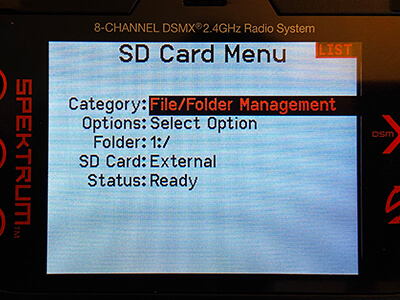
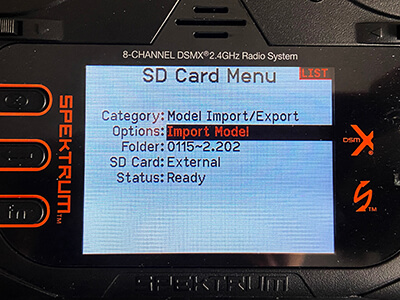
Upon arriving at the "SD Card Menu" screen, we need to perform a few tasks. First, confirm that your category is "Model Import/Export." Then, scroll down to the Folder option and select/enter that menu. -
Step 5:
We now need to find/select the folder where our model(s) are located. I am importing a model from my folder titled "01.15.2021 DX6." Click to enter this folder (if applicable). -
Step 6:
This screen is a bit misleading. Here are some tips:Both <BACK> options do NOT select a folder, but rather exit and return you to the "SD Card Menu."
The /.. selection physically goes up one folder level on the SD card itself, basically returning you back to the previous folder options.
The /. is the option we are looking for as it physically selects this folder as the destination for your model files. Use this selection.
-
Step 7:
Upon returning to the "SD Card Menu", scroll up to Options and select Import Model. Additionally, you could select "Import All Models" if you plan on importing an entire folder worth of models. -
Step 8:
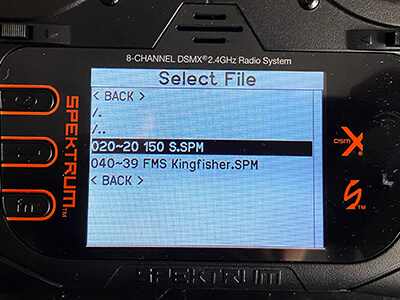
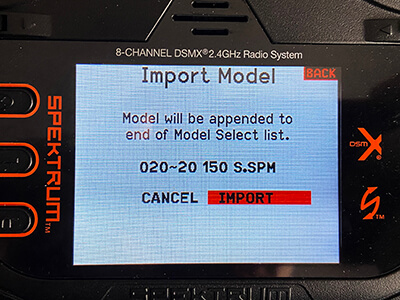
For the sake of this article, I am only importing one model, my Blade 150 S. Select the model you intend on importing. -
Step 9:
After selecting this model, we arrive at a screen confirming our selection and providing clarification that this model will be appended to the end of "Model Select" list. Now, select import. -
Step 10:
After a few seconds the process is complete. You will be taken back to the main screen and defaulted to your newly imported model! Remember to confirm ALL transmitter settings and do a pre-flight check prior to flying!
-
Learn more about updating your transmitter on YouTube.
Summary
Are the process above not working? Is your radio giving you trouble? Want to talk to an actual person? Contact our U.S. based product support team! This group is trained and experienced in troubleshooting your issue via chat/phone/email and will be able to offer any suggestions specific to your situation. Start here: https://www.horizonhobby.com/product-support-landing.html


